Tuesday, November 27, 2012

My Christmas Treasures!

There's nothing I love more than following an impulse and having it turn out to be a wonderful junking experience!  I was recently on business in the area of one of my favorite thrift shops.  I hadn't planned to stop in on that particular day but some supernatural force seemed to draw me into the parking lot (or it may have had something to do with the sign out front that said everything in the store was 1/2 price!).  I'm revamping my Christmas decorating style this year and had been looking at new vintage style ornaments in retail stores.  Sticker shock!  So, when I walked into the thrift store and saw huge piles of Christmas decorations, I started digging through them hoping to find one or two special ornaments.  I guess I kinda got carried away, but I couldn't believe what I was finding.  The pictures don't tell the whole story, but this is what I found:


Just look at these beautiful vintage style ornaments! (Sorry I didn't take them out of their boxes and ziploc bags.  I was so excited to show them to you that I forgot!)  There were four or five bags and five or six boxes - all with beautiful, shiny, vintage styled ornaments.


 These are probably my favorites.  It's not every day that you see black and white Christmas ornaments.  And the trims, pearls and ribbons made them perfect to me.  My only complaint is that I wish there had been more of them!


I can't wait to put these tree toppers on my trees.  They are both full sized and the one on the left is very heavy.

 
Look at these cute little ornaments!  The first two are knit and embroidered and the finish and distressing on the block ornaments make them look "antique".


This beautiful glass ornament is about five inches across and has a glass angel inside.  There's a small battery compartment on the bottom so I can only assume the angel lights up.  I'll be out searching for the right size batteries soon!


And then there are these two great wooden pieces.  I already have an idea for the large Winter Wonderland plaque.  The wooden angel has an imprint on the back saying it was handcrafted and gives the artist's name.  I have an idea for it, too, in a very special place. 


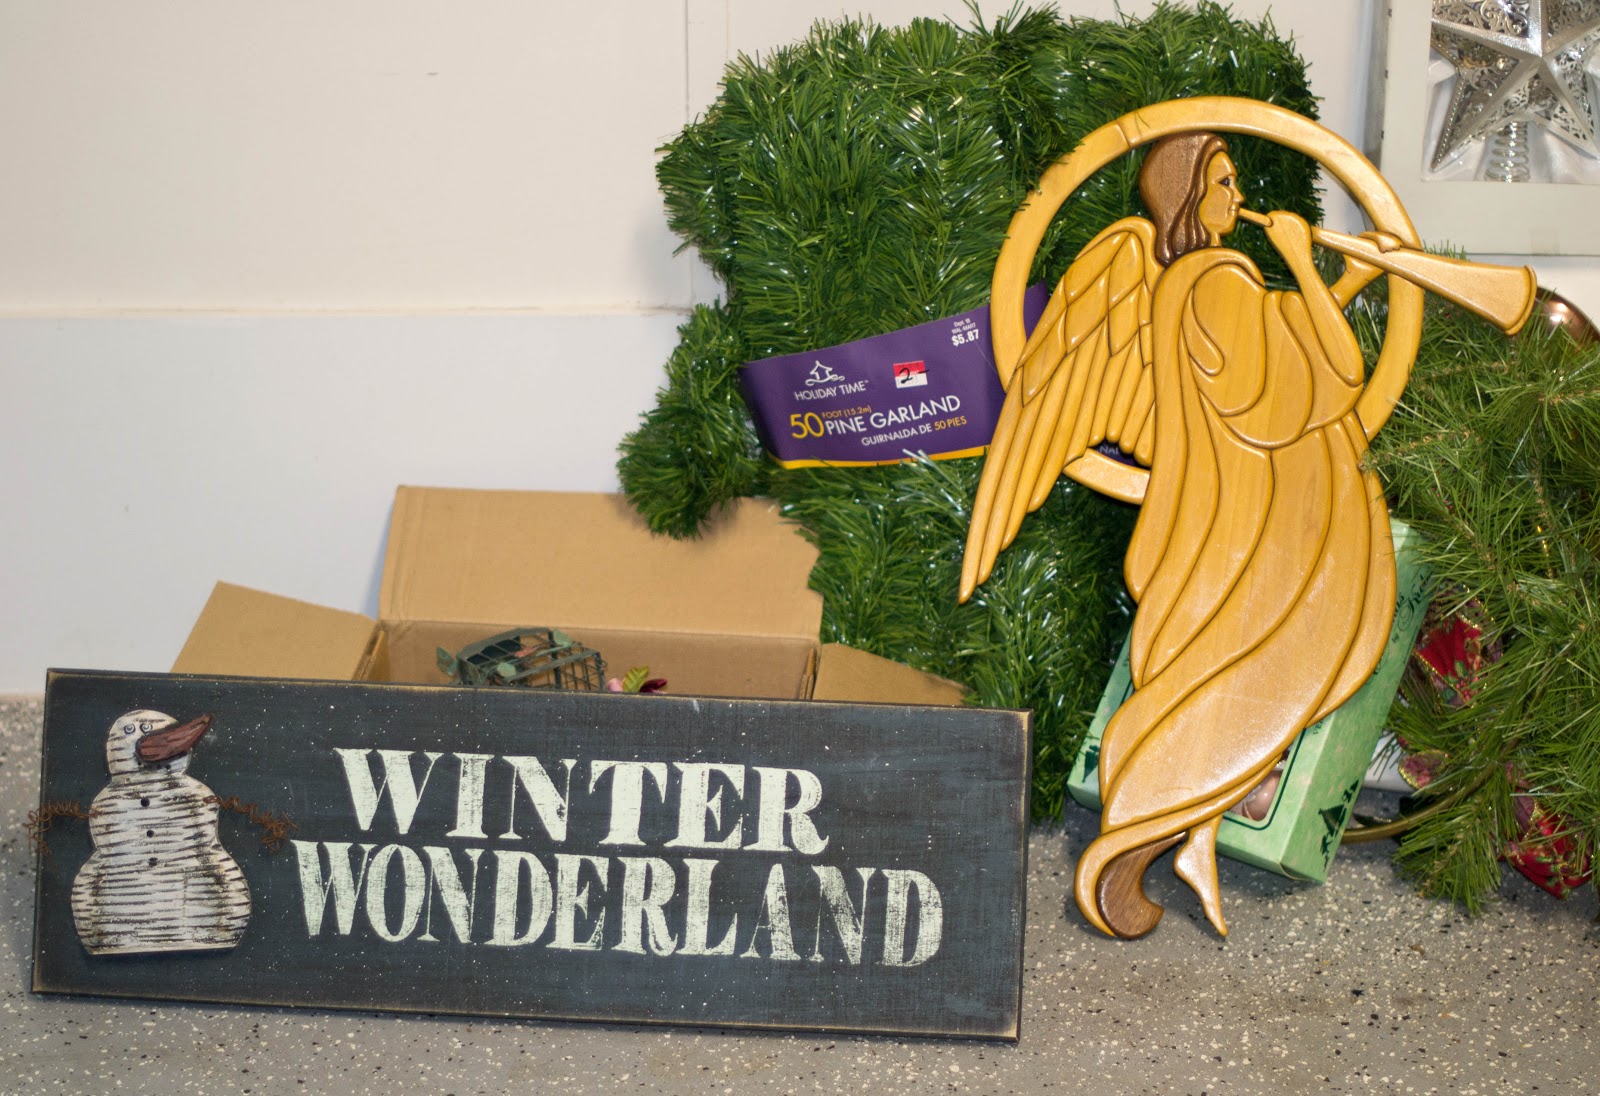
The 100 feet of unused garland, the silver rope with bells and the brass horn arrangement will all be used somewhere, I'm sure.  As a matter of fact, I know the perfect spot for the horn after it's revived a little bit.


I felt like I had hit the Christmas lottery with all of the goodies I found.  I have baskets and boxes and other containers that are just waiting to be filled with the ornaments.  Tip:  Learn that digging through true junk sometimes can turn up true treasures.  Keep your eyes and mind open!
 
Oh, and did I tell you that everything in the picture only cost me, tax included, $19?  Yep, nineteen dollars!  I'll show you how I put everything to good use in the near future.

Sunday, November 25, 2012

My Words of Wisdom

I love updating little tables and usually end up painting them.  But I wanted to do something a little different with this one and at first considered tearing up brown paper bags and placing the pieces on its top to simulate leather. 


Then I remembered this little gem I had picked up at a thrift store in anticipation of using it on a project in the future.  Well, the future is now!

 
The procedure I used is very similar to what I had considered with the brown paper bags, but the texture and thickness of the papers are different and the paper isn't crumpled.  To start with, I tore out several pages from different sections of the book (I didn't want all of the words to start with the same letter.  As if anyone would notice!).  I then tore off the "white space" borders on the tops, bottoms and sides of each page.


Since the dictionary pages had two columns, it made tearing the pages into smaller pieces easy.  I just tore the paper down the center and then tore each column into smaller pieces.  I got four to six pieces per page.  I tried to vary the shapes of the torn pieces so they wouldn't all look the same.  I randomly placed the torn pieces over the table top until I thought I had enough to cover it.


Then I removed all the pieces and painted the black border that was already on the table top with a little acrylic paint.  I also painted the brass knob black so it would coordinate more with the black border and the black print on the dictionary pages. 

Starting in the center of the table, I used a little Mod Podge on the back of each torn piece and placed them, one by one, on the table.  After each piece was glued on the table I used a wooden brayer (originally bought for wallpaper border) and rolled it over the pieces to get out air and excess Mod Podge before applying the next piece.  I randomly overlapped the pieces and alternated the angle of each piece.  I did make sure each piece faced the same way so they could be read when viewed from the front of the table.  The process was really fast but it slowed down once I reached the edges.  There, some pages had to be torn specifically for the area to be filled.  Also, the outside edges of the pages had to be cut straight to fit the edges of the table.  I found it was easiest to make the straight cut on the edge then tear the other edges of the papers to fit.  It sounds a little complicated but it was really easy.

 
Once the entire top was covered, I brushed two coats of Mod Podge on the top, drying between coats, in order to further seal the ink on the pages and to secure the torn edges.  After the second coat of Mod Podge was dry, I then brushed on a coat of clear polyurethane for a smoother finish and more protection.  I also coated the black border painted with acrylic paint and the knob with a coat of polyurethane.
 
This photo shows a few dark spots where the polyurethane wasn't quite dry, but it lets you see how the pieces were torn and how they were placed on the table top.


And here's the entire top with its refreshed black border and drawer knob.


I love this little one of a kind table and think it would be great in a reading area or in a home office - or really anywhere you want a unique piece of furniture.


Linked to:
 
Skip To My Lou My Uncommon Slice of Suburbia

Primitive and Proper

Friday, November 23, 2012

Miss Mustard Seed Milk Paint

I'm a huge fan of Annie Sloan Chalk Paint and use it for most of the furniture and other items I repaint.  There are three stockists/retailers "near" me and they all are approximately an hour and a half away.  Slightly inconvenient but so worth it once I have the paint in my hands!  But I've been wanting to try Miss Mustard Seed's Milk Paint since it became available three or four months ago.  But again, the closest retailer is an hour and a half way. 

There is a shop that I'd been wanting to visit that is almost two (yep two!) hours away from me.  It sells both ASCP and MMS so I used that as an excuse for a short road trip.  And I'm wanting to try MMS paint so much that I will drive that far.  At least once.

Miss Mustard Seed's Milk Paint generally gives a more "chippy" look and ASCP gives a more "European" finish.  There are some furniture pieces I paint that I just really want to have a shabbier look without having to sand and distress, so Miss Mustard Seed sounds perfect for those.

This is what I came home with:


Yes, the paint is in boxes!  MMS paints are powder and you only mix what you will use for each project.  I purchased three colors, the bonding agent, furniture wax and antiquing wax.  While I was out on my little road trip, I also stopped by a thrift store and picked up an old blender for mixing the paint and at another place I found a piece of furniture to try the paint out on.  I can't wait to get started.   I'll share the final project and how I like MMS paints very soon!

Sunday, November 18, 2012

From Ugly Duckling to Beautiful Swan

 
These are the kind of projects I just love from beginning to end!  I spotted this little spindly legged table and thought it might have great potential, but it was looking a little like an ugly duckling!  The legs were good but someone had nailed a painted wooden circle onto the top.  I took a chance and hauled it home with me.
 
 
After I pulled off the added on top, I found it was actually a piece of old panelling that had been added for who knows what reason!  I was excited to see the original top underneath was in pretty good shape except for little nail holes where the panelling had been nailed. 


I filled in the nail holes with wood filler and lightly sanded the top.  After two coats of Annie Sloan Chalk Paint in Paris Gray, I felt the table still looked a little plain and wasn't living up to its full potential (sorry, but in my enthusiasm I forgot to get a photo after the coats of paint).  I remembered I had picked up an inexpensive stencil on impulse awhile back and thought it would work perfectly.  I decided to just stencil across the center instead of over the entire top to keep the pattern from looking too "busy".  The stencil I used is the Jacobean Floral pattern made by DecoArt and I used Annie Sloan Chalk Paint in Old White.


After the stencil paint dried, I very lightly sanded the design to smooth out any texture created by the stencil paint.  I applied a coat of clear wax and then used fine sand paper to slightly distress around the edges.


 After applying more clear wax over the distressed areas and buffing to a soft sheen, the ugly duckling was turned into a beautiful swan!
 
 
 I'm going to have a hard time letting this one go!
 
Primitive and Proper

Thursday, November 15, 2012

Sneaking a Peek!

Old South Antique Mall will be holding its Christmas Open House this Saturday from 10 a.m. to 5 p.m.  Everything in the entire mall will be at least 20% off!  Come visit us, enjoy free refreshments and browse the goodies of over 60 vendors.

I just realized that 5 weeks ago I opened my booth.  It has been a super busy, whirlwind 5 weeks to say the least!  My days have been filled with searching for furniture and other items, painting and refurbishing them, setting up the booth and keeping it stocked, starting this blog and taking care of normal business activities.  Not to mention family responsibilities and my other business.  Whewwwwww!  And I even took two long weekend family trips during this time.  But, oh what fun I'm having!

I haven't posted any photos of my booth since my original post when I first opened the booth.  The booth is still a work in progress and I have so many ideas for the way I want the booth to look, items I want to carry and furniture I want to find and paint.  Patience is not one of my greatest virtues (I want it all and I want it now!) but I'm trying.  I still have more items to add before the Open House, but thought I'd give you a sneak peek of some of the items and how my booth has filled up and evolved over the past five weeks.


 Come join in the fun at Old South's Open House on Saturday.  And stay tuned for all the plans Shabby But Chic has in store!


Tuesday, November 13, 2012

Ethan & Allen

A couple of weeks ago I spotted two cute little tables in the back of one of my regular furniture hunting spots.  I loved the drawers with all the little knobs on front.  As I got closer, I saw they had received a lot of wear but other than the original finish being worn off on the tops, they were in good condition.  I opened one of the drawers and saw that they were old Ethan Allen tables probably from the 1960's, if not earlier.  Yep, I knew I had to have them!


For just a few seconds, I thought I might refinish instead of painting.  But I knew my impatience would get to me with the sanding, staining and varnishing of TWO tables!  So, I just kept it simple and applied two coats of no-prep Annie Sloan Chalk Paint in French Linen. 

 
The original wood was already distressed so I applied clear wax and slightly distressed the paint around the edges and drawers with sand paper. Buffing and re-applying the original drawer knobs were the last steps and they were done. Ethan & Allen!
 

Saturday, November 10, 2012

My Adventure At Renninger's

 Today I had the opportunity to go to Renninger's in Mt. Dora, Florida.  To say I was overwhelmed is an understatement!  Renninger's is actually made up of "Twin Markets" - an antique center and a flea market.  The antique center has over 200 booths and the flea market has over 700 vendors.  The flea market has the traditional inside stalls but the real fun, at least for me, was in the field "out back" where all the real bargains are if you enjoy searching and digging.  Admittedly, there is a lot of junk out back, as I was forewarned.  But there are also a lot of really neat items and vendors with interesting booths out back.  It was a gorgeous day to be outside and the vendors and fellow shoppers were all so cordial and made the experience even better. 

There's something for everyone and don't hesitate to bring along a man because there's LOTS of stuff for him, too!  I was concentrating so hard on all the goodies that I didn't take the time to get many photos, but I did manage to take a few.


I spent over four hours outside and didn't dig through each booth like I would have loved to. The only time I went in the inside flea market was to get something to drink and to use the restroom facilities. And I never even made it to the Antiques Center!  That is definitely on my list for my next visit. To learn more about all Renninger's has to offer, visit their web site at http://renningers.com/dora/dorahome.htm.
 
After I left Renninger's, I made stops at several thrift stores before I just got too tired to look any more! Central Florida seems to have a thrift store, antique mall or flea market on every corner. My kind of place!
 
This photo of my trunk doesn't tell the whole story because it doesn't show all the goodies hidden underneath.  And I'm too embarassed to show you the inside of the car!  Let's just say it had two end tables, a cute little bench with arms and lots of other fun items stuffed inside!  It's a good thing I didn't have a passenger because something (or someone!) would have been left behind. 
 
 
Today's finds will soon be moved into my booth at Old South Antiques Mall.  I can't wait to share them with you!


Wednesday, November 7, 2012

Reviving Old Frames

Some of my favorite projects are painting old portrait frames and smaller photo frames.  When I'm treasure hunting at thrift stores and flea markets I'm always keeping my eyes open for frames.  I found this large, sturdy frame at a thrift store and brought it home because of its size and the detail on the wooden frame.  However, the built-in matting left a lot to be desired, as it was dirty and stained.


The main part of the frame already had a two-toned slightly distressed look, so I chose to paint just the matting.  After two coats of Annie Sloan Chalk Paint in Coco on the mat, the frame looks almost good as new.


Some ideas for frame uses other than portraits are chalkboards, dry-erase boards, and bulletin boards.  There's a current trend to hang one or more empty frames and to hang smaller frames, wooden initials, wreaths or other objects inside the larger empty frame.


Or you can group several empty frames together as a frame gallery: 
 
 Tag-Sale Upgrades
 
 
Another idea is to string wire or string across the frame and use it to display cards and art, photos or notes:


I chose to make a photo/card display with my frame.  It could also be used in an office for pinning up notes, phone numbers, etc.  I used tiny clothespins I found in the craft section at WalMart.  They looked too new, so I dropped a couple of tea bags into a little boiling water, removed from the stove and then put the pins in for about 45 minutes.


One day I found this large frame while digging around at an old auction site.  For an instant I felt guilty that I was going to paint over the photo of the happy couple.  But then I decided their circumstances must have changed or it wouldn't be for sale!


After removing the portrait board, the frame was painted with two coats of Annie Sloan Chalk Paint in Versailles.
 
 
The frame was then slightly distressed, waxed with both clear and dark waxes and buffed.   The portrait board was primed with spray Kilz, and when dry, painted with Krylon spray chalkboard paint.  When the chalkboard paint was dry, the portrait board was secured back into the frame and the frame was ready for hanging.


Get out there and find some old frames and let your imagination run wild with the possibilities for them!


shabby creek cottage

http://betweennapsontheporch.net/metamorphosis-monday/